Android Lollipop 5.0 SDK (software development kit) and official system factory image files are now publicly available by Google for Nexu...
Android Lollipop 5.0 SDK (software development kit) and official system factory image files are now publicly available by Google for Nexus smartphone and tablet devices, but these files can also be installed on Windows, Mac OS X and Linux operating systems. We are sharing a step-by-step guide and tutorial on How to Setup, Config, Install and Run Android Lollipop on Your Windows, Mac and Linux PCs and Laptops.

Users are required to install Java Development Kit, Android SDK (x86 32-bit / x64 64-bit) computer architecture hardware and Android Lollipop Emulator, which are meant for testing and experimenting purposes by Android developers. If you want to experience full features of Lollipop, then it’s better to get the Android 5.0 Lollipop compatible hardware smartphone and tablet device. So let's start the full tutorial and guide on How to Install Android Lollipop on Windows, Mac OS X and Linux PCs and Laptops below.
Compatible Windows, Mac and Linux OS for Android Lollipop Installation:
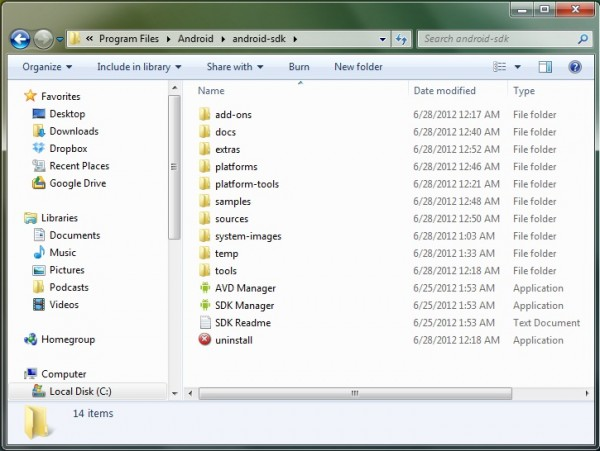
Step 1: First, Unzip, Extract or Install Java Development Kit and Android SDK (software development kit) on your respective PC / Laptop to any location.
Step 2: Now, Run "SDK Manager" application from your installed location.

Step 3: Android SDK Manager App will load and fetch all the Android SDK packages, wait for some seconds.
Step 4: Now, under Packages tab, select "Android 5.0 (API 21)" and "Android SDK Platform-tools" under Tools tab.
Step 5: Click on "Install Packages" button. Choose Agree to the License information to proceed, now wait until all the packages gets installed.
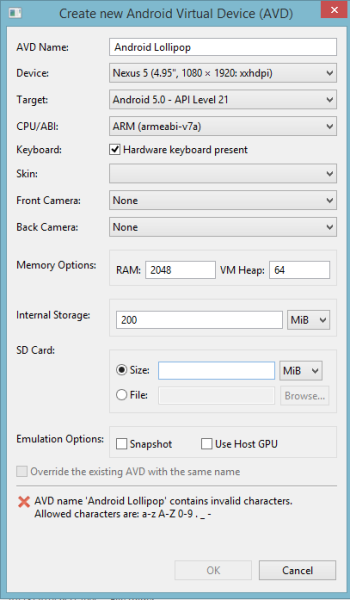
Step 6: Close the window after installation, and Go back to the Android SDK installation folder and run "AVD Manager" application. Click on "New" and create a virtual device with details as mentioned in below image and click "OK" button.

Step 7: After completion, choose your virtual device from the list and click on "Start".
Step 8: New window will appears, don’t change anything on it, and just click on "Launch" button immediately.
Step 9: Android Lollipop Emulator will start after a few Command Prompt windows and while booting it will take approx. 5 minutes for first boot, wait for some seconds.
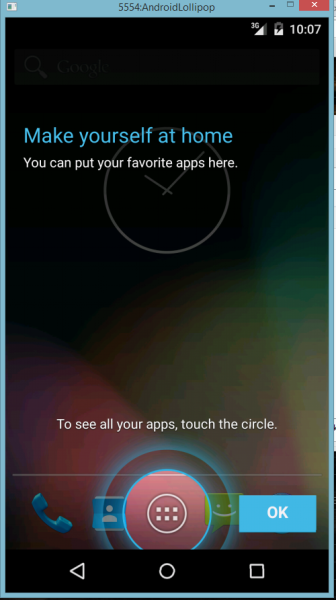
Step 10: After completion of android booting, you will get the following Welcome screen. Now you can enjoy Android Lollipop on Windows, Mac and Linux operating systems. Congratulations!!


Users are required to install Java Development Kit, Android SDK (x86 32-bit / x64 64-bit) computer architecture hardware and Android Lollipop Emulator, which are meant for testing and experimenting purposes by Android developers. If you want to experience full features of Lollipop, then it’s better to get the Android 5.0 Lollipop compatible hardware smartphone and tablet device. So let's start the full tutorial and guide on How to Install Android Lollipop on Windows, Mac OS X and Linux PCs and Laptops below.
Compatible Windows, Mac and Linux OS for Android Lollipop Installation:
- Windows 10
- Windows 8.1
- Windows 8
- Windows 7
- Windows Vista
- Windows XP
- OS X Yosemite v10.10+
- OS X Mavericks v10.9+
- OS X Mountain Lion v10.8+
- OS X Mountain Lion v10.7+
- OS X Snow Leopard v10.6+
- OS X Leopard v10.5+
- Linux, Ubuntu v11.04+ or higher
- Download Java SE Development Kit for Windows, Mac and Linux
- Download Android SDK for Windows, Mac and Linux
Step 1: First, Unzip, Extract or Install Java Development Kit and Android SDK (software development kit) on your respective PC / Laptop to any location.
Step 2: Now, Run "SDK Manager" application from your installed location.

Step 3: Android SDK Manager App will load and fetch all the Android SDK packages, wait for some seconds.
Step 4: Now, under Packages tab, select "Android 5.0 (API 21)" and "Android SDK Platform-tools" under Tools tab.
Step 5: Click on "Install Packages" button. Choose Agree to the License information to proceed, now wait until all the packages gets installed.
Step 6: Close the window after installation, and Go back to the Android SDK installation folder and run "AVD Manager" application. Click on "New" and create a virtual device with details as mentioned in below image and click "OK" button.

Step 7: After completion, choose your virtual device from the list and click on "Start".
Step 8: New window will appears, don’t change anything on it, and just click on "Launch" button immediately.
Step 9: Android Lollipop Emulator will start after a few Command Prompt windows and while booting it will take approx. 5 minutes for first boot, wait for some seconds.
Step 10: After completion of android booting, you will get the following Welcome screen. Now you can enjoy Android Lollipop on Windows, Mac and Linux operating systems. Congratulations!!


COMMENTS