If you own Apple iOS devices, then follow our Top 3 Best Ways to Record iPhone, iPad and iPod touch Screen Activity without Jailbreak.
While being able to record the display of an Apple device has become a popular request among iPad, and iPhone, users, Apple has yet to implement this as a main feature of the iOS platform. There are two reasons as to why this is the case, security reasons and privacy matters. While the user has stopped the recording process, there isn’t anything in place to prevent an app from recording as a background process. This can lead to the application developers to gain personal information including your payment information, passwords, and anything else that you may enter. Following is the Top 3 Best Ways to Record iPhone, iPad and iPod Screen Activity without Jailbreak.
However, Apple have allowed for alternate methods to record iPhone Screen such as using their very own QuickTime Player. The only thing about using this method is that a Mac computer is required, although if you don’t have a Mac computer to use this method, there are plenty of other methods out there which are not offered by Apple. To make it better, these methods do not require you to have jailbroken your device.
1. Using Your iPhone, iPad or iPod touch
While this method is definitely not one I recommend due to the lack of quality, using the camera on your iPhone or iPad to record the display of your iPad or iPhone is definitely an option. Although there are many negative sides to using this method, if you have no concerns over the quality of your recording and don’t have a Mac computer available, then this is a viable option.
With this method, given that you will have to hold your iPhone to do the recording, if you want to avoid a shaky recording and provide a semi-decent viewer experience, setting up some sort of stand (e.g. a tri-pod) to hold the iPhone in place during the recording is a must.
2. iPhone Screen Recording Software
iPhone Screen Recorder, one of the upcoming screen recording software, is constantly being updated to fix any issues that are found and provides all of the necessary features required to support you creating the best recordings available. If you’re looking to create recordings in order to walk people through how to do certain tasks on your Apple device, or maybe you want to record a Facetime session with your friend, no matter why you’re recording, with the iPhone Screen Recorder you can record what you want to.

One of the best things about using the iPhone Screen Recorder tool is that opposed to other options, no jailbreak is required and nor will you be required to connect your device to your computer using a USB cable. This means that you can record wherever you feel most comfortable, provided that your device and computer are connected to the same wireless network.
Using iPhone Screen Recorder is very simple and requires only a few moments of patience before jumping straight into the recording.
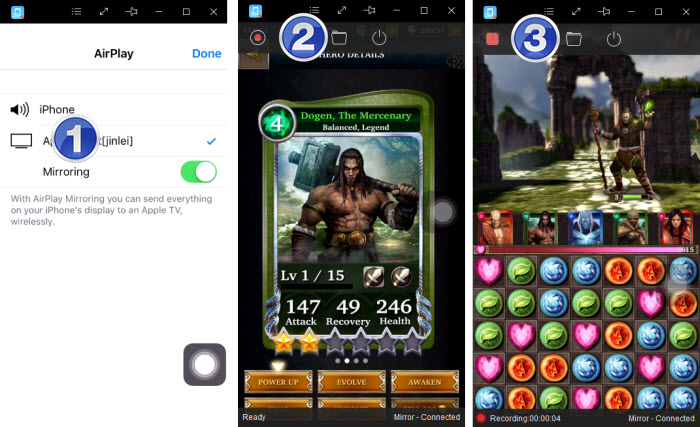
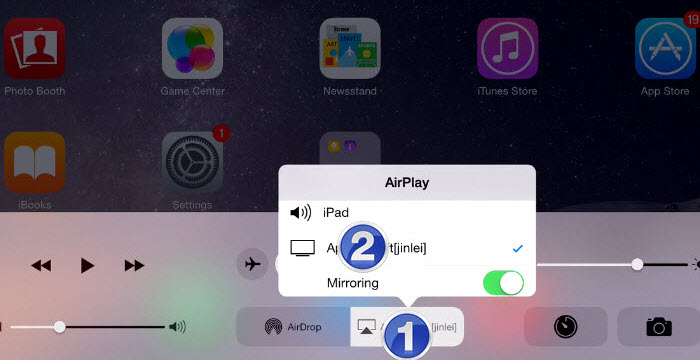
Make sure that the computer you will be using to record and the Apple device that you are using are both connected to the same wireless network. After doing that, you must enable the mirroring feature on your device. To do that, swipe upwards the device to have the control centre displayed. Tap on the “AirPlay” option and select the connection which is named the same as your computer, followed by the “Mirroring” option. Once you’ve done each of these steps, simply click on the red recording circle on the program, and your recording will begin.

As you can see, there’s not much to the process itself and in the end, you get a smooth and high quality recording out of it. In regard to both recording quality and formatting, the iPhone Screen Recorder app provides you with enough flexibility to have your recordings in as high as 1080P as well as being able to choose between recording qualities. Even better, if you’re looking to record audio along with your recordings, then you’re able to do just that.
While recording the display of an Apple device is a popular concept, Apple has yet to give the greenlight on applications which allow this to happen.
3. AirShou
Following on from the screen recorder iphone, AirShou is the second best option available when it comes to recording your Apple device’s display. When using this method, one of the best things about it is the fact you don’t have to Jailbreak your iPhone or iPad. On that note, let’s jump right into the method.
Due to how AirShou isn’t available on the Apple app store, you have to install an alternate app store to download AirShou from. Head over to the Emu4iOS.net website, where you will be able to select AirShou as well as download and install it from there.
Note: A common occurrence when installing AirShou is Apple detecting that the app hasn’t been trusted by the Apple app store. If this occurrence happens with you then follow the path Settings, General, Profiles & Device Management, and tap on the “Trust” button next to AirShou.

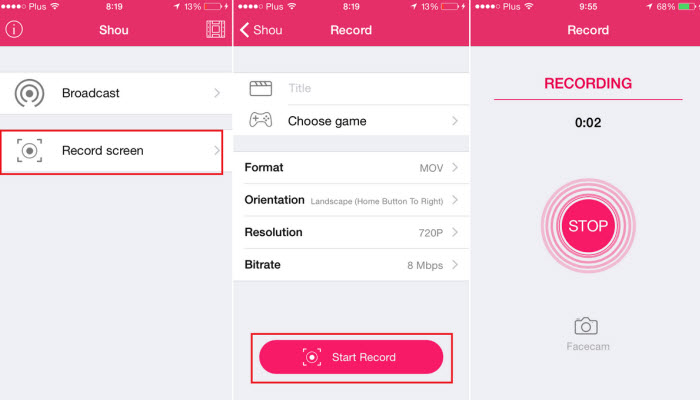
Once the program is downloaded, installed, and launched, you’re ready to jump into the recording process. Simply open up the program, define each of the settings to suit your needs, and click on the record button. After you’ve recorded all that you want to record, head back over to the app and click on the stop recording option.
The only issue with using AirShou for screen recording is that while it’s one of the best applications for the job, a red banner will be shown at the top of your screen during the recording itself.
However, Apple have allowed for alternate methods to record iPhone Screen such as using their very own QuickTime Player. The only thing about using this method is that a Mac computer is required, although if you don’t have a Mac computer to use this method, there are plenty of other methods out there which are not offered by Apple. To make it better, these methods do not require you to have jailbroken your device.
1. Using Your iPhone, iPad or iPod touch
While this method is definitely not one I recommend due to the lack of quality, using the camera on your iPhone or iPad to record the display of your iPad or iPhone is definitely an option. Although there are many negative sides to using this method, if you have no concerns over the quality of your recording and don’t have a Mac computer available, then this is a viable option.
With this method, given that you will have to hold your iPhone to do the recording, if you want to avoid a shaky recording and provide a semi-decent viewer experience, setting up some sort of stand (e.g. a tri-pod) to hold the iPhone in place during the recording is a must.
2. iPhone Screen Recording Software
iPhone Screen Recorder, one of the upcoming screen recording software, is constantly being updated to fix any issues that are found and provides all of the necessary features required to support you creating the best recordings available. If you’re looking to create recordings in order to walk people through how to do certain tasks on your Apple device, or maybe you want to record a Facetime session with your friend, no matter why you’re recording, with the iPhone Screen Recorder you can record what you want to.

One of the best things about using the iPhone Screen Recorder tool is that opposed to other options, no jailbreak is required and nor will you be required to connect your device to your computer using a USB cable. This means that you can record wherever you feel most comfortable, provided that your device and computer are connected to the same wireless network.
Using iPhone Screen Recorder is very simple and requires only a few moments of patience before jumping straight into the recording.
Make sure that the computer you will be using to record and the Apple device that you are using are both connected to the same wireless network. After doing that, you must enable the mirroring feature on your device. To do that, swipe upwards the device to have the control centre displayed. Tap on the “AirPlay” option and select the connection which is named the same as your computer, followed by the “Mirroring” option. Once you’ve done each of these steps, simply click on the red recording circle on the program, and your recording will begin.

As you can see, there’s not much to the process itself and in the end, you get a smooth and high quality recording out of it. In regard to both recording quality and formatting, the iPhone Screen Recorder app provides you with enough flexibility to have your recordings in as high as 1080P as well as being able to choose between recording qualities. Even better, if you’re looking to record audio along with your recordings, then you’re able to do just that.
While recording the display of an Apple device is a popular concept, Apple has yet to give the greenlight on applications which allow this to happen.
3. AirShou
Following on from the screen recorder iphone, AirShou is the second best option available when it comes to recording your Apple device’s display. When using this method, one of the best things about it is the fact you don’t have to Jailbreak your iPhone or iPad. On that note, let’s jump right into the method.
Due to how AirShou isn’t available on the Apple app store, you have to install an alternate app store to download AirShou from. Head over to the Emu4iOS.net website, where you will be able to select AirShou as well as download and install it from there.
Note: A common occurrence when installing AirShou is Apple detecting that the app hasn’t been trusted by the Apple app store. If this occurrence happens with you then follow the path Settings, General, Profiles & Device Management, and tap on the “Trust” button next to AirShou.

Once the program is downloaded, installed, and launched, you’re ready to jump into the recording process. Simply open up the program, define each of the settings to suit your needs, and click on the record button. After you’ve recorded all that you want to record, head back over to the app and click on the stop recording option.
The only issue with using AirShou for screen recording is that while it’s one of the best applications for the job, a red banner will be shown at the top of your screen during the recording itself.


COMMENTS